Most knitting patterns for hats are written for knitting in the round, either using double pointed needles (dpn’s), a short circular needle , or two circular needles.
But sometimes you want to make a hat on straight needles by working back and forth instead of knitting in the round. Maybe you don’t have needles for working in the round. Maybe you want to knit intarsia (which you can’t do in the round). Or maybe you want a break from knitting in the round and want to knit flat.
Good news! It’s easy to knit a hat on straight needles.
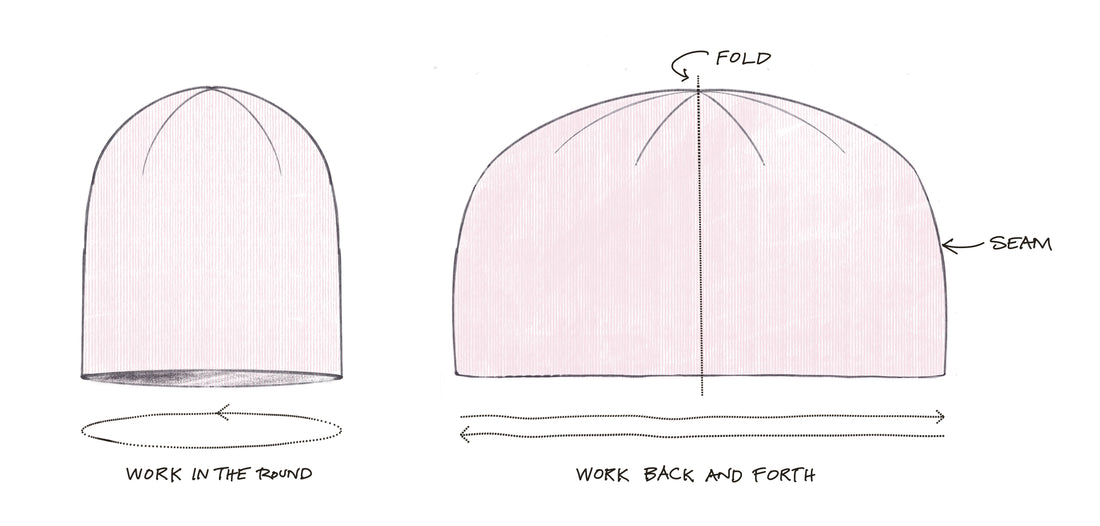
A hat knit in the round is usually cast on at the brim edge, joined, then worked in the round all the way to the top of the hat, with shaping for the crown.
A hat knit flat is worked the same way, except that the hat is worked as a flat rectangularish shape, then folded vertically and sewn into a tube.
If the pattern you are using is written for knitting in the round, you can adapt it for knitting in straight needles.*
*The only time this is less desirable is for a pattern with stranded colorwork. Then, you’ll get better results by working in the round. For example, I probably wouldn’t work the Gatineau Hat that way
Step 1. Figure out the basic anatomy of the hat in the pattern
Make note of the following numbers from the pattern:
Cast on
How many stitches are left at the end
For example, take a really simple hat, where you cast on 80 stitches, work in the round for 70 rounds, then decrease 6 stitches every 2 rounds, until there are 14 stitches left. Pull the yarn through the stitches and remove needles, draw tight.
Step 2. Modify the cast on
Cast on + 2 stitches for the seam. In our example, 80 + 2 = 82
How many stitches left at the end + 2. So 14 +2 = 16
Step 3. Decide on right and wrong side rows
In a pattern for working in the round, all rounds are usually right side.
In a pattern for working flat, you alternate wrong and right side rows.
If a pattern has any open work or cables the more complicated work is on the right side.
You’ll want to rewrite the instructions for the wrong side rows. You’ll flip the direction of the instructions, and the side of the stitch. Let me explain.
Say, in the round, you have:
Rounds 1 and 2) Knit3, purl2; repeat to end.
So working flat, you would do this:
Row 1 (Right side): Knit 3, purl 2; repeat to end.
Row 2 (Wrong side): Knit 2, purl 3; repeat to end.
Step 4. Work the hat with a selvedge
At the beginning of every row, slip the first stitch.
At the end of every row, knit the last stitch.
This will make a nice slipped stitch edge that will make it easier to sew the hat together.
Work the hat flat using your adapted pattern.
Step 5. Sewing the hat seam
Fold the hat in half, wrong sides together. Then sew it together using a mattress stitch. A mattress stitch is nearly invisible from the right side but does add bulk to the seam. You could alternately use a whip stitch, but that’s more visible.
*The only time this is less desirable is for a pattern with stranded colorwork. Then, you’ll get better results by working in the round. For example, I probably wouldn’t work the Gatineau Hat that way
Another way to make a hat on flat needles is by knitting a rectangle and folding it in half, then sewing the sides. That’s how the PussyHat is made. It makes cute cat ear corners. It’s also how I designed the baby hat in my beginner knitting book, Idiot’s Guide to Knitting.
